前言:从该教程往后,涉及到nginx的功能将越来越生产化,因此某些测试必须是基于web架构平台,所以在看本教程之前,建议先安装好LNMP或者LAMP架构,以便测试验证。其次该技术文档的测试是基于前端nginx反向代理与后端LNMP架构来测试的,后端LNMP主要是提供测试的访问页面而已,重点还是前端Nginx的设置
测试环境:
前端代理:
OS:CentOS6.5x64
hostname:test1.lxm.com
ip:10.0.10.11
后端LNMP:
OS:CentOS6.5x64
hostname:test2.lxm.com
ip:10.0.10.12
注意:未做特别说明,则所有配置均在前端代理上进行配置
1.nginx信号机制,平滑重启和平滑升级
nginx本身提供了5种信号机制,通过该信号机制能够实现nginx的平滑重启,平滑升级,日志切割等功能。
nginx信号机制:
HUP:实现平滑重启nginx,所谓平滑重启就是不重启nginx的master进程,关闭原有worker进程,打开新的worker进程,这个过程不会中断用户的请求
USR1:用于实现nginx日志的切割,使用该信号可以在不重启nginx进程的情况下,重新打开一个nginx日志文件
USR2:用来平滑升级nginx的可执行文件
WINCH:用来从容关闭nginx的worker进程,使用可信号不会立即结束nginx的worker进程,而是当worker进程处理完所有的连接后在关闭worker进程
QUIT:用来关闭nginx的master进程,在升级nginx时,会等所有的worker进程都结束后,从容的关闭nginx的旧版master进程
1)平滑重启:
#kill -HUP `cat /usr/local/nginx/logs/nginx.pid`
除此之外还有一种方式也可以达到平滑重启的目的:
#service nginx reload or /usr/local/nginx/sbin/nginx -s reload
验证:
查看当前nginx的进程,并记住进程号
[root@test1 sbin]# ps aux | grep nginx
root 1244 0.0 0.1 22276 900 ? Ss 13:44 0:00 nginx: master process /usr/local/nginx/sbin/nginx -c /usr/local/nginx/conf/nginx.conf
nginx 1246 0.0 0.2 22660 1504 ? S 13:44 0:00 nginx: worker process
平滑重启nginx:
[root@test1 sbin]# kill -HUP `cat /usr/local/nginx/logs/nginx.pid`
[root@test1 sbin]# ps aux | grep nginx
root 1244 0.0 0.4 22408 2292 ? Ss 13:44 0:00 nginx: master process /usr/local/nginx/sbin/nginx -c /usr/local/nginx/conf/nginx.conf
nginx 1254 0.0 0.3 22796 1656 ? S 13:48 0:00 nginx: worker process
[root@test1 sbin]# service nginx reload
nginx: the configuration file /usr/local/nginx/conf/nginx.conf syntax is ok
nginx: configuration file /usr/local/nginx/conf/nginx.conf test is successful
Reloading nginx: [ OK ]
[root@test1 sbin]# ps aux | grep nginx
root 1244 0.0 0.4 22408 2304 ? Ss 13:44 0:00 nginx: master process /usr/local/nginx/sbin/nginx -c /usr/local/nginx/conf/nginx.conf
nginx 1271 0.0 0.3 22804 1668 ? S 13:48 0:00 nginx: worker process
通过上面的对比,发现平滑重启后,nginx的master进程都保持不变,而worker进程每次都在变化
2)平滑升级
nginx的平滑升级功能是nginx的一大优势,通常软件在升级的时候都必然会导致重启服务而中断用户的请求服务。而nginx的平滑升级却可以实现热升级,在不中断用户请求服务的情况下就
可以完美实现版本的升级。
其次:要知道所谓软件的升级,通常升级的都是可执行文件,nginx也是一样,升级的是nginx的可执行文件
升级过程:
查看nginx当前版本:
[root@test1 nginx-1.7.4]# /usr/local/nginx/sbin/nginx -v
nginx version: nginx/1.6.1
[root@test1 nginx-1.7.4]#
可知,目前使用的版本是nginx1.6的,而要升级的是nginx1.7.4的版本
查看nginx编译的参数:
[root@test1 nginx-1.7.4]# /usr/local/nginx/sbin/nginx -V
nginx version: nginx/1.6.1
built by gcc 4.4.7 20120313 (Red Hat 4.4.7-4) (GCC)
TLS SNI support enabled
configure arguments: --prefix=/usr/local/nginx/ --with-pcre --with-http_ssl_module --with-openssl=/root/soft/openssl-1.0.1i --with-http_gzip_static_module --with-http_realip_module --with-http_stub_status_module --http-client-body-temp-path=/usr/local/nginx/client_body_temp/ --http-proxy-temp-path=/usr/local/nginx/proxy_temp/ --http-fastcgi-temp-path=/usr/local/nginx/fastcgi_temp/ --http-uwsgi-temp-path=/usr/local/nginx/uwsgi_temp/ --http-scgi-temp-path=/usr/local/nginx/scgi_temp/
由上面的信息可知nginx的编译参数
开始编译新版本的nginx:
[root@test1 nginx-1.7.4]# ./configure --prefix=/usr/local/nginx/ --with-pcre --with-http_ssl_module --with-openssl=/root/soft/openssl-1.0.1i --with-http_gzip_static_module --with-http_realip_module --with-http_stub_status_module --http-client-body-temp-path=/usr/local/nginx/client_body_temp/ --http-proxy-temp-path=/usr/local/nginx/proxy_temp/ --http-fastcgi-temp-path=/usr/local/nginx/fastcgi_temp/ --http-uwsgi-temp-path=/usr/local/nginx/uwsgi_temp/ --http-scgi-temp-path=/usr/local/nginx/scgi_temp/
configure若没有错误,显示如下信息:
Configuration summary
+ using system PCRE library
+ using OpenSSL library: /root/soft/openssl-1.0.1i
+ md5: using OpenSSL library
+ sha1: using OpenSSL library
+ using system zlib library
nginx path prefix: "/usr/local/nginx/"
nginx binary file: "/usr/local/nginx//sbin/nginx"
nginx configuration prefix: "/usr/local/nginx//conf"
nginx configuration file: "/usr/local/nginx//conf/nginx.conf"
nginx pid file: "/usr/local/nginx//logs/nginx.pid"
nginx error log file: "/usr/local/nginx//logs/error.log"
nginx http access log file: "/usr/local/nginx//logs/access.log"
nginx http client request body temporary files: "/usr/local/nginx/client_body_temp/"
nginx http proxy temporary files: "/usr/local/nginx/proxy_temp/"
nginx http fastcgi temporary files: "/usr/local/nginx/fastcgi_temp/"
nginx http uwsgi temporary files: "/usr/local/nginx/uwsgi_temp/"
nginx http scgi temporary files: "/usr/local/nginx/scgi_temp/"
[root@test1 nginx-1.7.4]# make
//注意:这里千万不要make install ,因为make install会全新安装nginx,而不是热升级了。如果没有什么报错,则说明make基本是成功了。接下来就是热升级的关键部分了
备份旧的可执行文件为nginx.old,拷贝新的可执行文件到/usr/local/nginx/sbin/目录下
[root@test1 nginx-1.7.4]# mv /usr/local/nginx/sbin/nginx /usr/local/nginx/sbin/nginx.old
[root@test1 nginx-1.7.4]# cp objs/ng
nginx nginx.8 ngx_auto_config.h ngx_auto_headers.h ngx_modules.c ngx_modules.o
[root@test1 nginx-1.7.4]# cp -p objs/nginx /usr/local/nginx/sbin/
[root@test1 nginx-1.7.4]# ls -l /usr/local/nginx/sbin
total 14544
-rwxr-xr-x. 1 root root 7515939 Aug 26 14:32 nginx
-rwxr-xr-x. 1 root root 7376337 Aug 21 16:03 nginx.old
测试新版的nginx可执行程序是否正常:
[root@test1 nginx-1.7.4]# cd /usr/local/nginx/sbin/
[root@test1 sbin]# ls
nginx nginx.old
[root@test1 sbin]# ./nginx -t -c /usr/local/nginx/conf/nginx.conf
nginx: the configuration file /usr/local/nginx/conf/nginx.conf syntax is ok
nginx: configuration file /usr/local/nginx/conf/nginx.conf test is successful
[root@test1 sbin]#
如上信息所示,nginx执行文件正常
升级nginx可执行文件:
[root@test1 sbin]# kill -USR2 `cat /usr/local/nginx/logs/nginx.pid`
[root@test1 sbin]# ps aux | grep nginx
root 1244 0.0 0.4 22408 2316 ? Ss 13:44 0:00 nginx: master process /usr/local/nginx/sbin/nginx -c /usr/local/nginx/conf/nginx.conf
nginx 16086 0.0 0.3 22796 1664 ? S 14:49 0:00 nginx: worker process
root 16094 0.0 0.5 22296 2728 ? S 14:50 0:00 nginx: master process /usr/local/nginx/sbin/nginx -c /usr/local/nginx/conf/nginx.conf
nginx 16095 0.0 0.3 22676 1512 ? S 14:50 0:00 nginx: worker process
root 16100 0.0 0.1 103244 848 pts/1 S+ 14:50 0:00 grep nginx
[root@test1 sbin]# ls -l /usr/local/nginx/logs/
total 92
-rw-r--r--. 1 root root 9064 Aug 25 10:47 access.log
-rw-r--r--. 1 root root 51603 Aug 26 14:50 error.log
-rw-r--r--. 1 root root 14158 Aug 25 10:47 host.access.log
-rw-r--r--. 1 root root 6 Aug 26 14:50 nginx.pid
-rw-r--r--. 1 root root 5 Aug 26 13:44 nginx.pid.oldbin
如上信息可见,系统中现在有两个nginx的主进程和各自的worker进程,而nginx的pid号也有两个,其中一个变成了nginx.pid.oldbin,这说明此时旧版nginx和新版nginx在共存。
查看80端口的请求连接:
[root@test1 sbin]#netstat -nultp | grep 80
由于是实验,无法演示效果,在生产环境中,你可以看到如果当前还有正在处理的请求,一定是旧版的nginx worker进程在处理,等处理完了,只剩下监听状态的时候就可以从容关闭旧版nginx的worker进程,不再处理请求
从容关闭worker进程:
[root@test1 sbin]# kill -WINCH `cat /usr/local/nginx/logs/nginx.pid.oldbin`
[root@test1 sbin]# ps aux | grep nginx
root 1244 0.0 0.4 22408 2316 ? Ss 13:44 0:00 nginx: master process /usr/local/nginx/sbin/nginx -c /usr/local/nginx/conf/nginx.conf
root 16094 0.0 0.5 22296 2728 ? S 14:50 0:00 nginx: master process /usr/local/nginx/sbin/nginx -c /usr/local/nginx/conf/nginx.conf
nginx 16095 0.0 0.3 22676 1512 ? S 14:50 0:00 nginx: worker process
由上面的信息可见,旧版的worker进程已经关闭。
从容关闭旧版的master进程:
[root@test1 sbin]# kill -QUIT `cat /usr/local/nginx/logs/nginx.pid.oldbin`
[root@test1 sbin]# ps aux | grep nginx
root 16094 0.0 0.5 22296 2728 ? S 14:50 0:00 nginx: master process /usr/local/nginx/sbin/nginx -c /usr/local/nginx/conf/nginx.conf
nginx 16095 0.0 0.3 22676 1512 ? S 14:50 0:00 nginx: worker process
root 16112 0.0 0.1 103244 848 pts/1 S+ 14:58 0:00 grep nginx
[root@test1 sbin]# ls -l /usr/local/nginx/logs/
total 88
-rw-r--r--. 1 root root 9064 Aug 25 10:47 access.log
-rw-r--r--. 1 root root 52115 Aug 26 14:58 error.log
-rw-r--r--. 1 root root 14158 Aug 25 10:47 host.access.log
-rw-r--r--. 1 root root 6 Aug 26 14:50 nginx.pid
[root@test1 sbin]#
由上面的对比可见,此时只剩下新版的nginx进程了,而且旧版的nginx的pid文件也自动消失了。。
查看nginx的版本号确认:
[root@test1 sbin]# /usr/local/nginx/sbin/nginx -v
nginx version: nginx/1.7.4
[root@test1 sbin]#
由此可见此时nginx的版本已经升级到1.7.4了。而在这个过程中,从未中断过用户的请求。接下来,删除旧的nginx的可执行文件即可
2.日志配置以及日志切割
在生产环境中,日志的收集分析也是很重的环节。对于一个web站点,通过日志可以基本的分析出pv,uv,ip以及流量等信息。为了对日志进行统一的管理,就必须事先设定好日志的格式,
以及日志的保存方式。
日志配置:
通常情况下使用nginx的默认日志配置即可,所有日志段都是nginx的内置变量组成的,如果想扩展nginx的日志,只需要添加你想要的变量即可。
log_format main '$remote_addr - $remote_user [$time_local] "$request" '
'$status $body_bytes_sent "$http_referer" '
'"$http_user_agent" "$http_x_forwarded_for"';
关于日志变量的分析,这里不在赘述,可以查看nginx配置文件分析一章
日志切割:
日积月累,日志文件的大小会越来越大,为了方便统计和管理,常见的是对日志进行每天切割保存。
nginx日志切割的原理是利用其USR1的信号机制,该信号可以使用nginx在不重启的情况下就打开一个新的日志文件
测试;
[root@test1 nginx]# cd /usr/local/nginx/logs/ //切换到日志目录下
[root@test1 logs]# ls //查看日志文件
access.log error.log host.access.log nginx.pid
[root@test1 logs]# pwd
/usr/local/nginx/logs
[root@test1 logs]# ps aux | grep nginx //查看现在的nginx进程好,一定要记住
root 16188 0.0 0.1 22276 900 ? Ss 15:12 0:00 nginx: master process /usr/local/nginx/sbin/nginx -c /usr/local/nginx/conf/nginx.conf
nginx 16190 0.0 0.3 22660 1844 ? S 15:12 0:00 nginx: worker process
root 16208 0.0 0.1 103244 844 pts/1 S+ 15:22 0:00 grep nginx
[root@test1 logs]# mv access.log access.log.bak //移动当前的日志文件为bak
[root@test1 logs]# kill -USR1 `cat /usr/local/nginx/logs/nginx.pid` //重新生成日志文件
[root@test1 logs]# ls
access.log access.log.bak error.log host.access.log nginx.pid //查看此时的日志文件,发现既有bak文件也有新生产的access.log文件
[root@test1 logs]# ps aux | grep nginx //查看此时的nginx进程号
root 16188 0.0 0.2 22276 1032 ? Ss 15:12 0:00 nginx: master process /usr/local/nginx/sbin/nginx -c /usr/local/nginx/conf/nginx.conf
nginx 16190 0.0 0.3 22660 1856 ? S 15:12 0:00 nginx: worker process
root 16213 0.0 0.1 103244 844 pts/1 S+ 15:23 0:00 grep nginx
[root@test1 logs]#
从上面的信息可以看出,nginx前后的进程号没有发生任何的变化,因此可知USR1该信号可以在不重新nginx进程的情况下,重新生成日志文件
日志切割计划任务部署:
切割脚本:
#vim /root/shellscripts/lognginx.sh
#!/bin/bash
logPath=/usr/local/nginx/logs //nginx日志的路径
logBackupPath=/root/logs //nginx日志备份的路径
oldLog=access.log //定义nginx的日志名
newLog=access-`date +%F`.log //定义nginx备份的日志文件名
pidPath=/usr/local/nginx/logs/nginx.pid //定义nginx的进程号文件
mv $logPath/$oldLog $logBackupPath/$newLog
kill -USR1 `cat $pidPath`
计划任务:
#vim /etc/crontab //添加一条如下内容,每天的凌晨进行日志切割
0 0 * * * root /root/shellscripts/lognginx.sh
#service crontab restart //重启守护进程
OK,到此nignx的日志切割也完成了。
3.关闭nginx版本号的显示
为了加强服务器的安全,隐藏软件版本也是其中的一个手段,默认情况下访问nginx出错时,会提示错误,但是也会显示nginx的版本号
测试;
http://10.0.10.11/index.html2 //在浏览器中随便输入一个不存在的url,此时nginx抱如下错误
由上面的信息,可以很直观的看出服务器使用了nginx,并且版本号是1.6.1. 对于高级的攻击者,根据版本好就可能找出相关的漏洞,因此必须要隐藏版本号
设置;
在nginx.conf配置文件的http{}段中,增加一条指令
server_tokens off;
重启nginx服务器,再次访问:
发现此时再次访问,虽然报错,但是已经没有nginx的版本信息了。
如果nginx后php整合了,建议同时取消fastcgi.param中的nginx版本信息: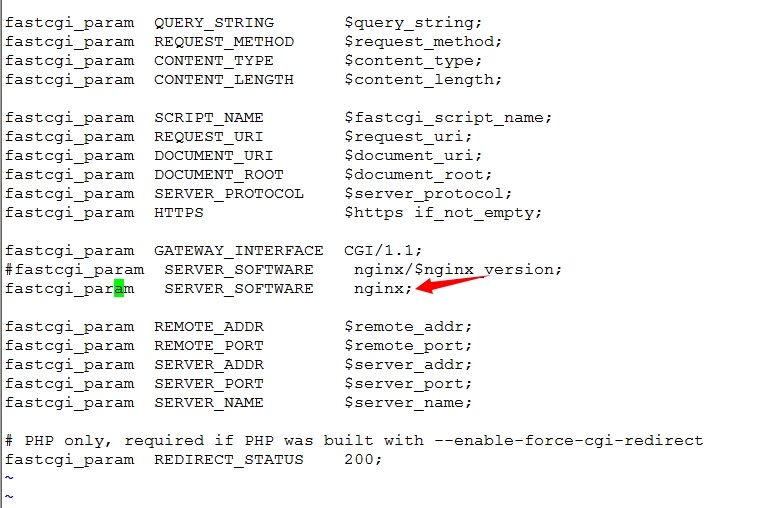
4.基于ip和http基本认证的权限配置
nginx本身也提供了一系列的安全防护功能,基本的有ip权限控制和用户认证控制
基于ip的认证:
基于ip的认证涉及到两个指令:allow deny。allow表示允许访问,deny表示不允许访问
测试:
修改nginx.conf配置文件,在location /里面添加deny 和allow指令
location / {
root html;
index index.html index.htm;
deny 10.0.10.12; //决绝该ip访问
allow all; //允许其他所有的ip地址访问
}
注意;allow,deny的匹配顺序是次序匹配,匹配到则结束
在10.0.10.12虚拟机上访问: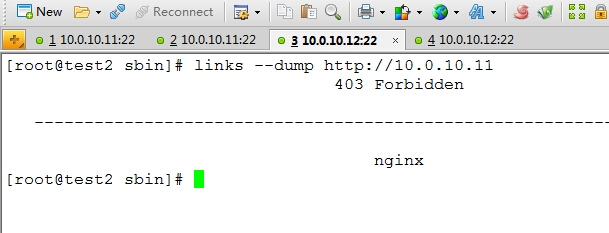
可以看到,访问被拒绝。
在宿主机上进行访问,此时发现可以正常访问,显示如下内容:
基于用户的认证:
nginx可以实现基本的用户认证
测试:
修改nginx.conf配置文件,修改内容如下:
location / {
root html;
index index.html index.htm;
auth_basic "relam authentication"; //auth_basci就表示开启用户身份认证功能
auth_basic_user_file /usr/local/nginx/htpasswd;
}
创建htpasswd文件:

//注:这里的htpasswd命令要借助于http-tool软件包,没安装得要安装一下
如上图所示,填入用户名和密码,点击确定即可访问。
5.nginx status查看
nginx提供了基本状态信息查看机制,该模块默认没有启用,要想启用该功能必须在编译nginx的时候手动添加;--with-http_stub_status_module
配置:
修改nginx.conf配置文件,在server{}段中添加一个location

访问: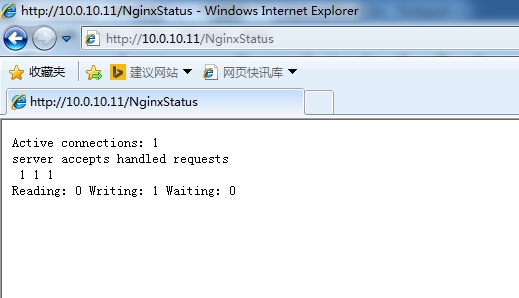
Active connections:表示当前活跃的连接数,
第二行的三个数字表示分别表示:nginx总共接受了多少个连接,成功建立了多少个连接,总共处理了多少个请求数
最后一行的Reading表示Nginx读取到客户端Header信息数, Writing表示Nginx返回给客户端的Header信息数,“Waiting”表示Nginx已经处理完,正在等候下一次请求指令时的驻留连接数
6.nginx 错误页面的配置
在客户端的访问过程中,肯定会出现这样或那样的错误,为了使体验更加的人性化,可以根据需要设计自己的错误页面,然后通过nginx中error_page选项来调用错误页面
error_page:用来设置错误的状态码转换到对应的错误页面
格式;
error_page status_code page;
但是光设置这个还没有用,还必须配置location来指定该页面所在的路径,才能正确的调用
测试案例;
在还没有配置的情况下,访问一个不存在的页面,会报 404 not found的错误
接下来配置nginx的404错误页面:
#echo "<h1>this is 404 error page</h1>" > /usr/local/nginx/html/404.html
重启nginx进程,然后再次使用:http://10.0.10.11/index.html2 ,此时会显示预先定义的错误页面内容.

转换流程:
客户端访问页面时,如果发生了一个404的错误,此时服务器端会自动将url地址转换为:http://10.0.10.11/404.html 此时就匹配了location的设置,从/usr/local/nginx/html目录下
查找404.html文件,将其中的内容返回给客户端。。
7.nginx gzip的配置
为了加速页面的响应速度,nginx提供了对静态文本实现gzip的压缩功能,也提供了带宽的利用率。
注:nginx默认不支持gzip的功能,要想开启该功能,必须在编译安装的时候手动添加--with-http_gzip_static_module来开启该功能
gzip相关的配置:
gzip on; 开启gzip压缩
gzip_min_length 1k; 设置允许压缩的页面最小字节数,默认为0,不管页面多大都压缩,建议设置成大于1k,要特别注意压缩的最小单位限制
gzip_buffers 4 16k; 设置允许多大的内存空间来压缩的缓存,默认值是申请与原始数据大小相同的空间来压缩。
gzip_http_version 1.1; 设置识别http协议版本
gzip_comp_level 2; 用来指定gzip的压缩比,1压缩比最小,处理最快,9压缩比最大,处理最慢,也比较消耗cpu
gzip_types text/plain application/x-javascript text/css application/xml; 用来指定压缩的类型,无论是否指定,text/html类型总是会被压缩。
gzip_vary on; 可以让前端的缓存服务器缓存经过GZIP压缩的页面,例如用squid缓存经过nginx压缩的数据。
以上即为gzip的常用设置,在这里需要说明一下的是gzip_types,该选项指定了要压缩文件的类型,如果你不知道,最好的办法是通过浏览器的调试功能来获取某类文件的类型。通过查看浏览器调试功能,开启网络调试,在页面的响应头中有一个Content-type的字段,该字段显示的就是此类文本的类型
example:

哈哈,图片截大了,拉小有点变形了,不过还是能看到的....
8.nginx 反向代理配置
nginx反向代理功能使用的是nginx的proxy模块,该模块默认已经支持。
测试案例:
在后端服务器10.0.10.12上创建好测试页面:index.html
#echo "<h1>this is a proxy test</h1>" > /usr/local/nginx/html/index.html
配置前端nginx代理功能:
相关配置如下: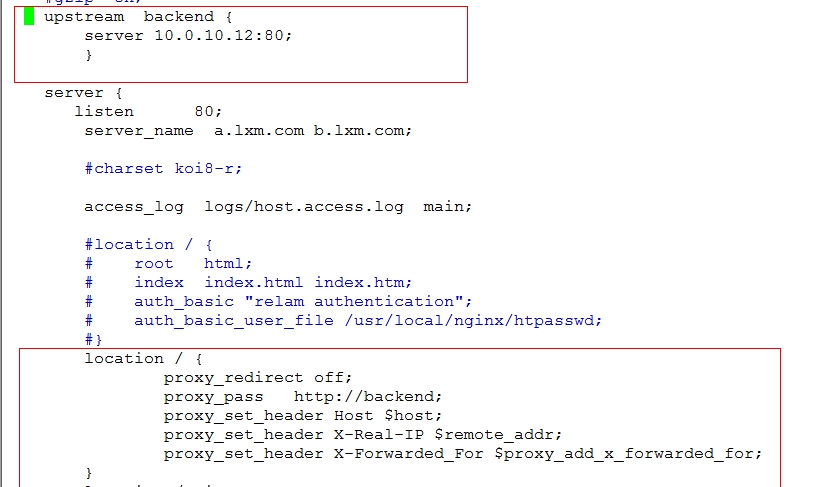
#service nginx configtest //测试配置文件是否有错误
#service nginx restart //重启nginx服务器
访问测试:
可以访问此时页面已经被代理到后端的服务器上了。到此一个简单的反向代理功能就实现了,根据自己的需要,可以实现各种反向代理功能,比如匹配某个特定的url进行代理等.
反向代理的优化:
以下内容可以放在某个server{}段内,也可以放在http{}段内,对所有的server都生效
proxy_connect_timeout 90;
proxy_send_timeout 90;
proxy_read_timeout 90;
proxy_buffer_size 4k;
proxy_buffers 4 32k;
proxy_busy_buffers_size 64k;
proxy_temp_file_write_size 64k;
相关选项含义:
proxy_set_header:设置由后端的服务器获取用户的主机名或者真实IP地址,以及代理者的真实IP地址。
proxy_connect_timeout:表示与后端服务器连接的超时时间,即发起握手等候响应的超时时间。
proxy_send_timeout:表示后端服务器的数据回传时间,即在规定时间之内后端服务器必须传完所有的数据,否则,Nginx将断开这个连接。
proxy_read_timeout:设置Nginx从代理的后端服务器获取信息的时间,表示连接建立成功后,Nginx等待后端服务器的响应时间,其实是Nginx已经进入后端的排队之中等候处理的时间。
proxy_buffer_size:设置缓冲区大小, 默认,该缓冲区大小等于指令proxy_buffers设置的大小。
proxy_buffers:设置缓冲区的数量和大小。nginx从代理的后端服务器获取的响应信息,会放置到缓冲区。
proxy_busy_buffers_size:用于设置系统很忙时可以使用的proxy_buffers大小,官方推荐的大小为proxy_buffers*2。
proxy_temp_file_write_size:指定proxy缓存临时文件的大小
proxy_next_upstream:该选项设置当客户端访问页面时,如果后端服务器返回该选项后面设置的错误时,则自动将请求转发到负载均衡中的下一台服务器,实现故障转移
接下来聊一聊upstream
upstream指令用来设置上游服务器,并且根据需要可以设置一些策略:
样例:
upstream backend {
ip_hash; 设置nginx的负载均衡方法。
server 192.168.12.133:80;
server 192.168.12.134:80 down;
server 192.168.12.135:8009 max_fails=3 fail_timeout=20s;
server 192.168.12.136:8080;
server 192.168.12.137:8080 backup;
}
Nginx的负载均衡模块目前支持4种调度算法,下面进行分别介绍,其中后两项属于第三方的调度方法。
轮询(默认)。每个请求按时间顺序逐一分配到不同的后端服务器,如果后端某台服务器宕机,故障系统被自动剔除,使用户访问不受影响。
Weight。指定轮询权值,Weight值越大,分配到的访问机率越高,主要用于后端每个服务器性能不均的情况下。
ip_hash。每个请求按访问IP的hash结果分配,这样来自同一个IP的访客固定访问一个后端服务器,有效解决了动态网页存在的session共享问题。
fair。比上面两个更加智能的负载均衡算法。此种算法可以依据页面大小和加载时间长短智能地进行负载均衡,也就是根据后端服务器的响应时间来分配请求,响应时间短的优先分配。Nginx本身是不支持fair的,如果需要使用这种调度算法,必须下载Nginx的upstream_fair模块。
url_hash。按访问url的hash结果来分配请求,使每个url定向到同一个后端服务器,可以进一步提高后端缓存服务器的效率。Nginx本身是不支持url_hash的,如果需要使用这种调度算法,必须安装Nginx 的hash软件包。
在HTTP Upstream模块中,可以通过server指令指定后端服务器的IP地址和端口,同时还可以设定每个后端服务器在负载均衡调度中的状态。常用的状态有:
down,表示当前的server暂时不参与负载均衡。
backup,预留的备份机器。当其他所有的非backup机器出现故障或者忙的时候,才会请求backup机器,因此这台机器的压力最轻。
max_fails,允许请求失败的次数,默认为1。当超过最大次数时,返回proxy_next_upstream 模块定义的错误。
fail_timeout,在经历了max_fails次失败后,暂停服务的时间。max_fails可以和fail_timeout一起使用。
注意 当负载调度算法为ip_hash时,后端服务器在负载均衡调度中的状态不能是backup
测试upstream的某些功能:
1)测试默认的负载均衡
为了测试实验效果,在前端代理10.0.10.11主机上再装一个httpd软件,搭建一个本地的web站点
#yum -y install httpd
#vim /etc/httpd/conf/httpd.conf
修改内容:
Listen 8080 //修改其监听端口为8080,因为此时nginx的监听端口为80,不修改会冲突
#service httpd start //启动httpd服务
#echo "<h1>this is 10.0.10.11 website</h1>" > /var/www/html/index.html
配置完成后你可以先用浏览器或者links测试一下http是否能够正常提供服务:
http://10.0.10.11:8080
links --dump http://10.0.10.11:8080
配置前端代理nginx:
修改配置文件的location /和upstreamd的配置使其达到测试的需求:
location / {
proxy_redirect off;
proxy_pass http://backend;
proxy_set_header Host $host;
proxy_set_header X-Real-IP $remote_addr;
proxy_set_header X-Forwarded_For $proxy_add_x_forwarded_for;
}
upstream backend {
server 10.0.10.11:8080;
server 10.0.10.12:80;
}
说明:将请求代理到后端服务器组backend,此时的backend中有两台服务器,采用的是默认的轮询负载均衡规则
#service nginx configtest
#service nginx restart
创建测试页面,以便区别:
10.0.10.12:
#echo "<h1>this is 10.0.10.12 website</h1>" > /usr/local/nginx/html/index.html
注意:这里为了测试效果,所以测试页面的内容不一样,真正在生产环境中,两台服务器的内容应该是一摸一样的
测试:
第一次访问:
第二次访问:
由上面的信息可知,nginx可以正常的切换。你在测试时可以多刷新几次查看效果。
2)测试ip_hash
ip_hash的效果是对ip地址进行hash,同一个ip地址会发送到同一台后端服务器,因此当设置了ip_hash之后,测试页面时,同一个ip地址访问无论怎么刷新,页面都不会变化。
配置nginx.conf文件:
upstream backend {
ip_hash;
server 10.0.10.11:8080;
server 10.0.10.12:80;
}
#service nginx configtest
#service nginx restart
自行测试效果。。。。
3)测试backup的功能
backup的功能是做冗余备份来使用,默认情况下backup主机是不参与负载均衡请求,当其他主机都出现故障无法响应时,backup才会响应客户端的请求
配置nginx.conf文件:
upstream backend {
server 10.0.10.11:8080;
server 10.0.10.12:80 backup;
}
注意:backup不能和ip_hash一起使用
#service nginx configtest
#service nginx restart
测试:
多次访问页面:
[root@test1 conf]# links --dump http://10.0.10.11
this is 10.0.10.11 website
[root@test1 conf]# links --dump http://10.0.10.11
this is 10.0.10.11 website
[root@test1 conf]# links --dump http://10.0.10.11
this is 10.0.10.11 website
[root@test1 conf]#
由上面的信息发现,不管怎么访问,返回的都是同一个页面
此时,停止10.0.10.11上的站点:
再次访问:
[root@test1 conf]# links --dump http://10.0.10.11
this is 10.0.10.12 website
[root@test1 conf]# links --dump http://10.0.10.11
this is 10.0.10.12 website
[root@test1 conf]# links --dump http://10.0.10.11
this is 10.0.10.12 website
[root@test1 conf]# links --dump http://10.0.10.11
this is 10.0.10.12 website
[root@test1 conf]#
由上面的信息进行对比,可见backup已经生效。。。
4)测试proxy_next_upstream故障转移的功能
修改nginx.conf的配置文件如下:
location / {
proxy_redirect off;
proxy_pass http://backend;
proxy_set_header Host $host;
proxy_set_header X-Real-IP $remote_addr;
proxy_set_header X-Forwarded_For $proxy_add_x_forwarded_for;
proxy_next_upstream http_500 http_502 http_503 error timeout invalid_header;
}
upstream backend {
server 10.0.10.11:8080;
server 10.0.10.12:80;
}
#service nginx configtest
#service nginx restart
测试:
从上面的配置看,upstream现在是默认的轮询负载均衡机制,默认情况下,会轮询到两台服务器上,现在要模拟proxy_next_upstream中的一个错误来看效果。我这里采用在10.0.10.12后端主机上使用iptables禁止80端口的访问,测试当轮询到10.0.10.12这台主机上时,由于禁止访问会导致超时,此时会返回10.0.10.11上的站点内容
[root@test1 log]# links --dump http://10.0.10.11
this is 10.0.10.11 website
[root@test1 log]# links --dump http://10.0.10.11
this is 10.0.10.11 website
[root@test1 log]#
由上面的信息可知,测试效果已经生效。。。。第二次的请求时会有一个超时的时间需要等待一会,但毕竟是实验环境,线上环境时不可能这么长,但足以说明效果是达到了。。。
注:upstream的相关功能就测试这么几个,其他的内容都是一样的测试机制,如果有需要请自行测试。。。
9.nginx fastcgi配置
nginx的fastcgi接口是用来整合php,将客户端对php的页面请求,转发到后端的php服务器上,由php程序进行解析并返回结果
基本的配置:
location ~ \.php$ {
root /usr/local/nginx/html;
fastcgi_pass 127.0.0.1:9000;
fastcgi_index index.php;
# fastcgi_param SCRIPT_FILENAME /scripts$fastcgi_script_name;
fastcgi_param SCRIPT_FILENAME $document_root$fastcgi_script_name;
include fastcgi_params;
以上配置说明,将php文件转发给后端的php服务器,这里的fastcig_pass指定的是本地,如果nginx和php服务器不是同一台,则要修改php的监听地址,然后将这里的地址该为php服务器的地址。具体测试这里不在赘述,在LNMP中都有...
fastcgi的优化:
fastcgi_connect_timeout 300;
fastcgi_send_timeout 300;
fastcgi_read_timeout 300;
fastcgi_buffer_size 64k;
fastcgi_buffers 4 64k;
fastcgi_busy_buffers_size 128k;
fastcgi_temp_file_write_size 128k;
以上内容可以放在http{}段,也可以放在location{}段
fastcgi cache设置:
fastcgi_temp_path /usr/local/nginx/fastcgi_temp;
fastcgi_cache_path /usr/local/nginx/fastcgi_cache levels=1:2 keys_zone=TEST:10m inactive=5m max_size=10g;
以上两行内容必须放在http{}段
下面的内容放在server{}段中
fastcgi_cache TEST;
fastcgi_cache_valid 200 302 1h;
fastcgi_cache_valid 301 1d;
fastcgi_cache_valid any 1m;
fastcgi_cache_key $host$request_uri;
fastcgi_cache_methods GET HEAD;
fastcgi_cache_min_uses 1;
fastcgi_cache_use_stale error timeout invalid_header http_500;
fastcgi_ignore_client_abort on;
相关解释:
fastcgi_cache_path:该选项用来定义fastcgi的缓存目录的信息。/usr/local/nginx/fastcgi_cache 这是缓存的目录文件 levels 设置缓存目录的子目录级别1:2 表示允许二级子目录,通常一级子目录允许16个,二级子目录允许256个,以此类推,keys_zone用来设置内层缓存区的缓存名和缓存大小 inactive 用来设置缓存的过期时间,max_size 表示允许使用硬盘作为缓存的最大空间
fastcgi_cache_valid:定义哪些状态码的请求要缓存
fastcgi_cache_min_uses:URL经过多少次请求将被缓存
fastcgi_cache_use_stale:定义哪些情况下用过期缓存
fastcgi_cache_key:定义fastcgi_cache的key,示例中就以请求的URI作为缓存的key,Nginx会取这个key的md5作为缓存文件,如果设置了缓存哈希目录,Nginx会从后往前取相应的位数做为目录
fastcgi_cache:用哪个缓存空间
注意:设置不是一定的,可以根据自己的需要进行调整。。。。此外fastcgi还有很多其他的设置,更多的请看官方手册
为了给大家一个直观的感受,我这里还是测试一下fastcgi的缓存效果。。。
修改前端代理nginx.conf:
http{}段增加:
fastcgi_temp_path /usr/local/nginx/fastcgi_temp;
fastcgi_cache_path /usr/local/nginx/fastcgi_cache levels=1:2 keys_zone=TEST:10m inactive=5m max_size=10g;
add_header X-Cache-TEST "$upstream_cache_status - $upstream_response_time"; //用来在浏览器响应头部中查看缓存是否命中
server段{}中:
location ~ \.php$ {
root html;
fastcgi_pass 10.0.10.12:9000;
fastcgi_index index.php;
fastcgi_param SCRIPT_FILENAME $document_root$fastcgi_script_name;
fastcgi_cache TEST;
fastcgi_cache_valid 200 302 1h;
fastcgi_cache_valid 301 1d;
fastcgi_cache_valid any 1m;
fastcgi_cache_key $host$request_uri;
fastcgi_cache_methods GET HEAD;
fastcgi_cache_min_uses 1;
fastcgi_cache_use_stale error timeout invalid_header http_500;
fastcgi_ignore_client_abort on;
include fastcgi_params;
}
#service nginx configtest
#service nginx restart
#mkdir /usr/local/nginx/fastcgi_cache //创建缓存目录
配置后端10.0.10.12服务器:
修改/usr/local/php55/etc/php-fpm.conf:
#listen = 127.0.0.1:9000
listen = 10.0.10.12:9000
#pkill php-fpm
#/usr/local/php55/sbin/php-fpm //重启php-fpm进程
测试:
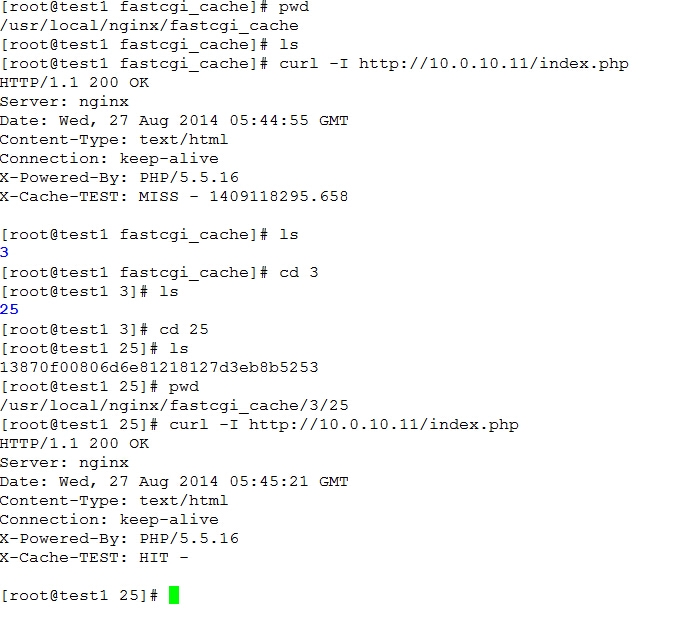
从上面的信息可以看出,第一次访问时,状态为MISS,但是缓存目录已经有缓存产生了,第二次访问时,显示HIT,说明缓存命中
10.nginx proxy_cache缓存配置
nginx本身支持proxy_cache的缓存设置,通常可以用来将后端服务器的静态页面,图片文件等缓存到本地的一个目录中,在缓存失效期间内,当客户端再次请求时,会直接从缓存中响应,而
不需要从后端服务器再次获取。
exmaple:
proxy_temp_path /usr/local/nginx/proxy_temp;
proxy_cache_path /usr/local/nginx/proxy_cache levels=1:2 keys_zone=cache_one:200m inactive=1d max_size=30g;
location ~ .*\.(gif|jpg|png|htm|html|css|js|flv|ico|swf)(.*) {
proxy_pass http://backend;
proxy_redirect off;
proxy_set_header Host $host;
proxy_cache cache_one;
proxy_cache_valid 200 302 1h;
proxy_cache_valid 301 1d;
proxy_cache_valid any 1m;
expires 30d; //这个是设置客户端浏览器对匹配的内容缓存的时间,跟proxy_cache无多大关系
}
测试的方法和fastcgi_path类似,这里不在赘述,有问题留言。。。
注:经过网友的多翻测试,对于页面缓存的设置,通常要考虑两个方面的内容,一个是后端源服务器页面头部设置的缓存,二个是nginx自身设置的缓存策略。通常能设置缓存策略的对象有,nginx inactive,nginx expires,源服务器exipres,源服务器max-age,nginx proxy_cache_valid
这些选项都能对缓存的过期时间产生影响,其影响过期时间的优先级是:inactive,源服务器expires,源服务器max-age,nginx proxy_cache_valid .
注意:当nginx expires 和源服务器的expires冲突时,对于客户端而言,将以nginx的expires为准,而对于nginx而言缓存文件的expires时间以源服务器的expires设置为准
11.nginx 内核优化配置
为了使nginx所在的服务器能够提供更好的性能,不得不根据实际情况对内核进行优化。。下面的优化是网上的一个见的比较多的设置,你喜欢就用吧。。
net.ipv4.ip_forward = 0
net.ipv4.conf.default.rp_filter = 1
net.ipv4.conf.default.accept_source_route = 0
kernel.sysrq = 0
kernel.core_uses_pid = 1
net.ipv4.tcp_syncookies = 1
kernel.msgmnb = 65536
kernel.msgmax = 65536
kernel.shmmax = 68719476736
kernel.shmall = 4294967296
net.ipv4.tcp_max_tw_buckets = 6000
net.ipv4.tcp_sack = 1
net.ipv4.tcp_window_scaling = 1
net.ipv4.tcp_rmem = 4096 87380 4194304
net.ipv4.tcp_wmem = 4096 16384 4194304
net.core.wmem_default = 8388608
net.core.rmem_default = 8388608
net.core.rmem_max = 16777216
net.core.wmem_max = 16777216
net.core.netdev_max_backlog = 262144
net.core.somaxconn = 262144
net.ipv4.tcp_max_orphans = 3276800
net.ipv4.tcp_max_syn_backlog = 262144
net.ipv4.tcp_timestamps = 0
net.ipv4.tcp_synack_retries = 1
net.ipv4.tcp_syn_retries = 1
net.ipv4.tcp_tw_recycle = 1
net.ipv4.tcp_tw_reuse = 1
net.ipv4.tcp_mem = 94500000 915000000 927000000
net.ipv4.tcp_fin_timeout = 1
net.ipv4.tcp_keepalive_time = 30
net.ipv4.ip_local_port_range = 1024 65000
12.nginx 防盗链的配置
Nginx的防盗链功能也非常强大。在默认情况下,只需要进行简单的配置,即可实现防盗链处理。
要实现防盗链,就需要使用valid_referers指令,官方的样例:
valid_referers none blocked server_names
*.example.com example.* www.example.org/galleries/
~\.google\.;
if ($invalid_referer) {
return 403;
}
解释:
valid_referers :用来设置符合条件的域名或URL
none:表示referer字段为空的
blocked:来源头部的referer不为空,但是被防火墙和代理给删除了,这些都不是以http://或者https://开头的
server_names:表示referer字段中包含了本地域名
string:任何正则表达式在域名中匹配的域名
如果域名不符合valid_referers中设置的,invalid_referer变量的值就为1,此时就会执行if中的语句
具体解释请看官网
一个简单的模拟案例:
前端nginx设置:
如上图所示,在主server{}中增加一个别名c.liwei.com
然后在server{}段中添加一个额关于jpg的location设置:
location ~* .*\.(jpg)?$ {
proxy_redirect off;
proxy_pass http://backend;
valid_referers none blocked lxm.com *.lxm.com;
if ($invalid_referer) {
#return 403;
rewrite ^/ http://10.0.10.12/error.html;
}
表示匹配jpg的图片都转发到后端,并且设置了防盗链规则
#service nginx configtest
#service nginx restart
后端服务器:10.0.10.12
修改/usr/local/nginx/html/index.html内容如下:
注意:这里做了一个picture的连接,使用的是c.liwei.com
在创建一个error.html文件:
在上传一个图片error.jpg的测试图片到/usr/local/nginx/html/error.jpg(图片内容随你自己)
测试:
第一次:http://a.lxm.com/error.jpg 直接访问图片,此时是以域名a.lxm.com来访问的,可以访问
第二次:http://c.liwei.com 此时返回的是带有picture连接的页面,点击picture连接,返回的是error.html的页面内容,说明访问被拒绝并且页面做了重写规则


注:要做更加复杂的防盗链处理,可以使用Nginx的HttpAccessKeyModule,通过这个模块可以实现功能更强大的防盗链处理,更详细的参考官方文档。
13.nginx 重写规则
rewrite常用的正则匹配:
* ~ 为区分大小写匹配
* ~* 为不区分大小写匹配
* !~和!~*分别为区分大小写不匹配及不区分大小写不匹配
下面是可以用来判断的表达式:
-f和!-f用来判断是否存在文件
-d和!-d用来判断是否存在目录
-e和!-e用来判断是否存在文件或目录
-x和!-x用来判断文件是否可执行
rewrite标记:
last – 该标记表示重写url,但是重写之后还会重新发起server段的请求,因此使用该标记之后,一定要注意会不会引起url重写的死循环
break – 该标记表示重写url,但是重写当前url规则后,就终止后续rewrite的执行
redirect – 返回临时重定向的HTTP状态302,浏览器中的url地址会跳转
permanent – 返回永久重定向的HTTP状态301,浏览器中的url地址会跳转
下面是可以用作判断的全局变量
例:http://localhost:80/test1/test2/test.php
$host:localhost
$server_port:88
$request_uri:http://localhost:80/test1/test2/test.php
$document_uri:/test1/test2/test.php
$document_root:D:\nginx/html
$request_filename:D:\nginx/html/test1/test2/test.php
案例:
server {
listen 80;
server_name a.lxm.com;
index index.html index.php;
root html;
if ($host !~ “.*\.lxm\.com") {
rewrite ^(.*) http://10.0.10.12/error.html last;
}
}
基本上rewrite就是这样的用法,主要的是要知道不同的变量所代表的函数以及正则表达式的书写,根据需要自行测试
14.nginx 防恶意解析
为了防止域名恶意解析攻击,可以给nginx设置一个默认的虚拟主机来匹配这些非正常的解析,但是该虚拟主机必须放在所有server{}段的首部
配置:
server {
listen 80 default_server;
return 403; //这里也可以使用rewrite等其他方法
}
测试:随便使用一个未设置的主机名

由上面可知,访问被拒绝,防止恶意解析生效。。。。
到此,nginx基本的必知必会就聊到这里了,聊的好累,本人都是全程文本测试,为了给大家展示还截了各种奇葩的图,你说你怎么谢我吧。。。。。哈哈。
结束!!!
笨蛋的技术------不怕你不会!!!!
本文出自 “生死如梦莫多情” 博客,请务必保留此出处http://mingyang.blog.51cto.com/2807508/1545785


